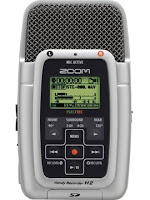
Well folks, this is going to be the official debut thread for the New Zoom H2 recorder that many have heard about.
The functions are very similar in to the H4. So anyone who has used an H4 will know most capabilities.
I am going to break down the unit into Pro/Cons.
Pros:1. Small form factor (even smaller then the Edirol R09). This will make it very easy to place on a groom or person without getting in the way or looking too clunky. It's best placed in the breast pocket on on his waist, just as you would place a wireless transmitter on his person.
2. Very nice build. The finish is very nice satin steel finish (yes it's plastic), and very solidly built. It actually feels much more substantial and well built then the H4.
3. Manual controls: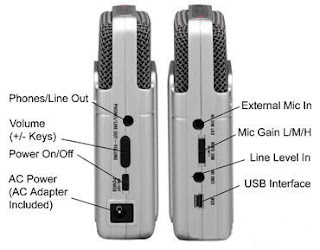
a. Nice recessed buttons that make it very easy to navigate, as well as avoid buttons from accidentially getting hit during recording.
b. Recording levels can adjusted on the outside of the unit. No digging into the menu like the H4. Yippee.
c. 4 different mic configurations.90 degrees: record from front of mic element
2 Channel stereo: mic records from front and back of mic (you can place this right on a mic stand in the middle of a band and record either the entire band at once, or face one side of the mic towards the crowd and the other towards the band to record both sources.)
4 Channel Surround: Record in the same manner as 2Ch,
EDIT: Creates two separate WAV files (labels them SR***L and SR***R)...thus allow you to set the 3D panning of the four mic elements. This can either be done in computer sound program, or the unit itself (you can set your levels after recording, to create your 4 channel mix).
120 degree: record using the back of the unit to record in a 120 degree radius.
d. L/M/H Gain settings on outside of unit for quick adjustments when needed
5. Normalization: you can normalize your recording right in the unit with no need to do it on the computer
6. Menu adjustable AGC/Compressor/Limiter
7. Digital audio pass through. Record to the unit and send the identical signal to your camera (via wireless) by way of the Phones/Line Out 1/8 port
8. 1/8 Mic and Line in ports. Don't have actual tests with this yet, but they are there for easy access. Actually this unit is really meant to be used as a mic recorder and external mics shouldn't be needed. BTW Mark mentioned to me today " One item I'm concerned with is the ext. mic circuit...will it allow GS lavs (etc) to plug in and record without the audio falling into the noise floor..." I wouldn't worry about that too much as you should be able to use the units external gain settings to prevent that. I believe that you would have to supply mic power to the lavs though (which is in the menu).
9. SD card recording: From early reports you can record to SD cards up to 4GB without a problem. And some selected 8-12 GB cards. The only drawback here is that you have to format the cards outside of the unit.
10. High fidelity recordings. You can record in as high as 24/96 WAV format. No worry about sync issues for the most part here. We'll have to see when reports roll in from the field.
11. Built in mics. The mics actually sound a bit cleaner than the H4 mics do. Again, we have to wait till I or others get it in the field.
12. Time stamp and track marker function in WAV record mode.
13. NEW, as reported by Mark: Good news on the lav issue...not only do regular lav mics work (you have to enable mic power through the menu) but GS mic wired for the iRiver works also. When you're using an ext. lav mic with a typical wired configuration, it will record to left channel only. If you use a Giant Squid that was configured to work with your iRiver, it will record to right channel.... "
14. NEW, as reported by Mark: Good and bad news for the hold function... Bad news...the on/off switch is still active so if someone shuts it off...well..... Good news...the recording goes through shut down process so you won't loose file.
15. NEW, as reported by Mark: Unit will use either alkaline or oxyride batteries...I would recommend oxyride for long record times at receptions
* Explanation of oxyride battery: Oxyride batteries use updated alkaline chemistry that includes a finer grained graphite and manganese dioxide, allowing a denser fill of material. With an advanced substance for the cathode or negative (-) side, called oxy nickel hydroxide the batteries maintain higher voltage. Oxyride batteries also utilize a vacuum-pouring technology in the production process, allowing more electrolyte to be packed into each battery for increased durability. Hence, increased power and a longer life....
16. NEW, as reported by Mark: Full-time Monitoring: To enable full time monitoring of the input signal, press the menu key. Scroll through unitl you see "monitor" and select "on"
17. NEW, as reported by Mark: Another "cool" feature: by pressing the play/pause button while recording, you can set a BWF (Broadcast Wave Format) compatible cue point. Not sure all NLEs can read this info...but it places a marker on the audio timeline. This would be beneficial in a long recording to identify important areas when scrubbing a timeline
18. Ease of transferring files to the computer over the iRiver...no more importing files to the iRiver music manager to convert. Simply select "USB" on the menu and the computer sees the H2 as a removable drive
19. Latest Update on SDHC cards: Just purchased SanDisk (comes with SDHC reader for your computer) and PNY SDHC 4GB cards from Circuit City. The H2 recognized them and formated them with no problem. They also function perfectly. Still waiting to see what the best deal might be on obtaining 8GB SDHC card.
20. You are able to format and use 8GB SDHC cards. I purchased this 8GB Transcend SDHC card, and was able to format the card in the H2 itself and use it.
21. To prep the H2 to place on groom or officiant after you switch it on, place a small piece of electrical tape over the on/off switch. This will not only keep it from accidentally being switched off, but will hide the switch itself so THEY don't switch it off before you want it to.
22. NEW, in response to Cons #7 on the preamps and loud venue recording. this would be the best recorder setup to record loud events, like micing a PA stack.
H2 loud environment recording
Mic Gain low,90° from the front,
Limiter - concert,
Wave 16bit/48 kHz (at least 16/48 so you can have the same bitrate as your recorded DV tape)
Cons:1. Form factor for mounting on a mic stand. The H2 has a 1/4 thread at it's base, which means that the unit is really meant to be mounted straight up. They do supply a small pole of some kind that could be mounted into a mic holder if needed. But I would hate it.
2. SD card loads from the bottom. The same bottom that the unit mounts. Means that you have to remove the unit to change cards. However, if you use long running 2-4 8-12 GB cards, then there would be no need to remove these cards when recoding in the field.
3. No XLR inputs. Well we knew this. And not really a bit con, since I wouldn't be using an external mic with this unit. Except for maybe a lav.
4. Levels can't be adjusted while unit is in Hold mode (hold the Menu key to put the unit in "Key Hold" mode). You can power the unit down or adjust the L/M/H gain switch on the unit if needed.
5. Never insert or remove the SD card while power to the H2 is on. Otherwise data can be destroyed.
6. When you change SD cards, the H2 does not retain your current setings. EDIT: Your settings seem to be cached in the SD card themselves and not the H2 memory. So if you inserted a brand new SD card you would get the default 44/16 WAV settings.
7. Pre Amps are not that great. Used the H2 at a wedding this weekend in placed in front of Bose speakers the DJ was using, with H2 set on M (Medium) pre amp. At a point he cranked the sound up. Audio turned to squelching mush, until I set Pre amp to L (Low), then all was good. If you place H2 in front of PA stack, make sure that you turn Pre amp to L (Low).
8. I just found out from testing the H2 won't do a 2gb seamless split...it loses about a second or two....
These are just some quick observations.
And more and sound tests and info will be added to this thread when they become available.
I will say, that for those looking for a replacement for their IRivers. That's a small form factor, inexpensive (only $199 and that was the actual retail price for the 1GB IRiver. And this can record on SD cards for up to at least 4GB.), record in MP3 (why bother), when you can record in WAV 16/48, 24/48 or 24/96, built in stereo mics, that can record in 4 channel surround, and much more.
From what I have seen first hand, It's here in the form of the H2. While it won't be the best audio unit out there. It will be the best low cost unit out there.
H2 Recording setup UPDATE:Due to the fact that the H2's audio input level is set before the pre amps, some additional noise floor noise can be heard. To solve this problem, ALWAYS set your record level at least at 100. then set you onboard L/M/H pre amp accordingly for usage. So an optimal setup for micing a loud PA stack would be Pre Amp: L (low) Recording Level: 100-110 Limiter/Compressor: OFF Mic
Config: 2CH or 4CH for optimal ambient recording. This setup should yield most acceptable recoding with little problems.
Recording Setup: Wave 16bit/48 kHz or 24/96 (at least 16/48 so you can have the same bitrate as your recorded DV tape)

 Well as some of you may or may not know, I shoot event video and use a pair of Sony FX1 cameras.
 The switches on the box are a little on the small side, but manageable for my fat fingers.


